This guide shows you how to bake delicious banana bread without a loaf pan. Whether you’re a seasoned baker looking to try something new or a beginner eager to whip up a tasty treat, this method is perfect for everyone.
Using simple kitchen tools and a few tricks, you can enjoy the mouthwatering aroma and moist texture of homemade banana bread without the constraints of a traditional loaf pan. Let’s dive into the steps to achieve this delectable creation that will surely impress your friends and family.
Step-by-Step Instructions for Baking Banana Bread Without a Loaf Pan
Choose the Right Baking Dish:
To begin your banana bread baking adventure, you’ll need to select the appropriate baking dish. Opt for a word that closely resembles the shape and size of a traditional loaf pan. A rectangular or square baking dish works best, allowing the bread to rise evenly and maintain its delightful texture.
You can also use a round cake pan if that’s what you have. Ensure the dish is well-greased to prevent sticking and facilitate easy removal of the finished banana bread.
Prepare the Baking Dish:
Before diving into the mixing process, make sure your chosen baking dish is adequately prepared. Grease the dish with butter or cooking spray, covering the bottom and all sides to prevent the banana bread from sticking.
For an added layer of protection, consider lining the greased dish with parchment paper. This step will guarantee a smooth release of the banana bread once it’s fully baked.
Mix the Ingredients:
Now comes the fun part – mixing the ingredients for your delicious banana bread! In a large mixing bowl, mash ripe bananas until smooth and creamy. Add wet ingredients, such as eggs, oil or melted butter, and vanilla extract. Stir everything together until well combined.
Whisk together the dry ingredients separately, including all-purpose flour, baking soda, salt, and a hint of ground cinnamon for that extra flavor boost. Slowly fold the dry ingredients into the wet mixture, careful not to overmix – a few lumps are perfectly fine!
Pour the batter into the Baking Dish:
With the batter ready, it’s time to pour it into the prepared baking dish. Use a rubber spatula to scrape every last bit of the luscious banana batter into the container, ensuring an even distribution.
Smooth out the top with the spatula to create a uniform surface for baking. Don’t worry if the batter seems thick; it magically transforms into moist, fluffy banana bread during baking.
Bake the Banana Bread:
Now that your batter is snug in the baking dish, it’s ready to go into the oven. Preheat your oven to the recommended temperature and place the baking dish on the center rack. Let the banana bread bake perfectly, filling your kitchen with its enticing aroma.
Keep a close eye on it, as baking times may vary depending on your oven and the depth of the batter in the dish. Use a toothpick or cake tester to check for doneness – if it comes out clean or with just a few moist crumbs, your banana bread is ready to be savored!
With these step-by-step instructions, you can confidently bake scrumptious banana bread without needing a loaf pan.
Choosing the Right Baking Dish
When baking banana bread without a loaf pan, selecting a suitable dish is crucial to achieve the perfect results. While a loaf pan is a traditional choice, several alternative baking dishes can work equally well. Let’s explore some different types of baking dishes that can be used to bake your delicious banana bread:
Rectangular Baking Dish:
A rectangular baking dish is an excellent substitute for a loaf pan. It closely mimics the shape and size of a traditional loaf pan, allowing the banana bread to rise evenly and maintain its characteristic form. Look for a baking dish approximately 9×5 inches or 8×4 inches for best results.
Square Baking Dish:
Similar to the rectangular one, a square baking dish can also be used to bake banana bread without a loaf pan. The even sides of the plate help the bread rise uniformly, and it’s a convenient option if you don’t have a suitable loaf pan.
Round Cake Pan:
While not the most traditional choice, a round cake pan can work surprisingly well for baking banana bread. It’s essential to use a cake pan with a similar capacity to a standard loaf pan to ensure the batter fills the pan to the proper depth. Grease the cake pan thoroughly to prevent sticking, and you’ll be rewarded with a circular version of the beloved banana bread.
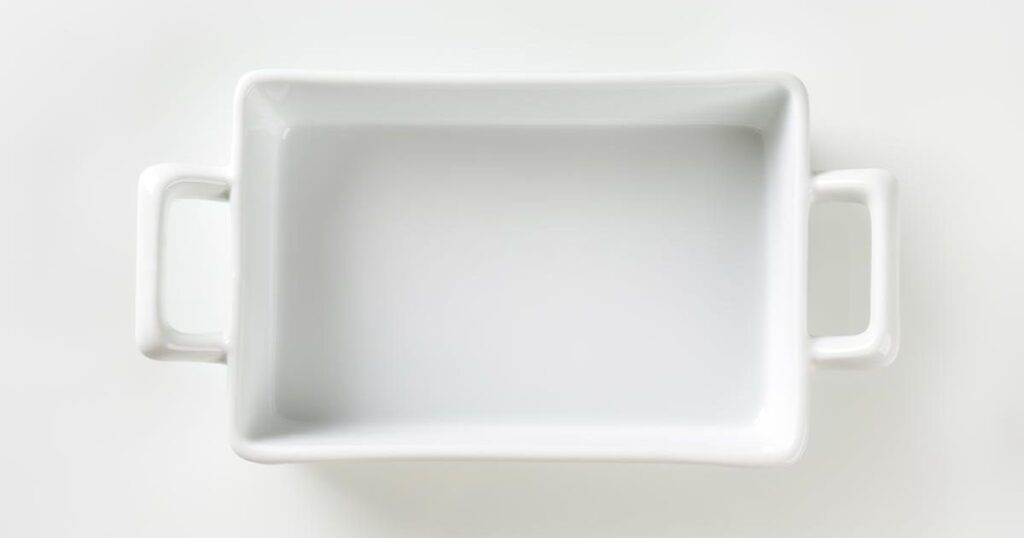
Casserole Dish:
If you don’t have any of the above options, don’t worry – a casserole dish can save the day! Choose a medium-sized casserole dish; although the shape may differ from a loaf pan, the banana bread will still bake beautifully.
Muffin Tin:
For a fun twist on traditional banana bread, you can use a muffin tin to create delectable banana bread muffins. Grease the muffin cups or use paper liners, fill them with the batter, and bake to perfection. This option is perfect for individual servings and makes for a portable treat.
Remember to adjust the baking time accordingly when using different baking dishes, as the thickness of the batter on the plate may affect the baking duration. Whichever baking dish you choose, following the rest of the steps in this guide will ensure your banana bread turns out moist, flavorful, and a delightful treat for your taste buds.
Preparing the Baking Dish
Before you start mixing the ingredients for your delicious banana bread, it’s essential to properly prepare the baking dish to ensure easy removal and a perfectly baked loaf. Preparing the baking dish correctly will prevent the banana bread from sticking and help maintain its shape. Here’s how to get your baking dish ready:
Grease the Baking Dish:
Using either butter or cooking spray, generously grease the inside of the baking dish. Make sure to coat the bottom and all sides of the container thoroughly. Greasing the dish will create a non-stick surface, allowing the banana bread to release effortlessly once it’s fully baked.
Consider Using Parchment Paper:
For added insurance against sticking, you can line the greased baking dish with parchment paper. Cut a piece of parchment paper that fits the bottom and sides of the container, leaving some overhang on the edges for easy lifting. The parchment paper will provide an extra layer of protection and make it even easier to remove the banana bread after baking.
Grease the Parchment Paper (Optional):
If you choose to use parchment paper, you can further reduce the chances of sticking by lightly greasing the surface of the parchment paper as well. This step is optional but can ensure a smooth release of the banana bread, leaving no crumbs or remnants behind.
With the baking dish adequately prepared, you’re all set to move on to the next step in baking your delicious banana bread without a loaf pan.
Mixing the Ingredients
Now that your baking dish is ready, it’s time to gather all the delicious ingredients and mix them to create the perfect banana bread batter. This delightful recipe calls for a few staple kitchen items to form a moist and flavorful treat. Here’s the list of ingredients you’ll need:
Ripe Bananas: Select ripe bananas with brown spots on their skins. These bananas are sweeter and easier to mash, adding a rich flavor and natural sweetness to the bread.
Eggs: Eggs act as a binding agent and structure the banana bread. They also contribute to its tender texture.
Oil or Melted Butter: Choose vegetable oil or melted butter to moisten the banana bread. Both options work well, and the choice depends on your preference.
Vanilla Extract: A dash of vanilla extract enhances the overall flavor profile of the banana bread, providing a warm and inviting aroma.
All-Purpose Flour: All-purpose flour serves as the base ingredient, giving the banana bread its characteristic structure.
Baking Soda: Baking soda is the leavening agent responsible for the bread’s rise. It reacts with the acidic components in the bananas to create a light and airy texture.
Salt: A pinch of salt balances the sweetness of the bananas and enhances the overall flavor of the bread.
Ground Cinnamon (Optional): Add some ground cinnamon to the mix for extra flavor. Cinnamon complements the bananas and gives the bread a warm and comforting taste.
With these ingredients ready, you have all you need to create a delectable banana bread batter. Remember to use ripe bananas for maximum sweetness and follow the next steps closely to ensure the ingredients blend seamlessly.
Pouring the Batter into the Baking Dish

With the banana bread batter perfectly mixed and brimming with delightful flavors, it’s time to pour it into the prepared baking dish. This step is crucial to ensure an even distribution of the batter, leading to a beautifully baked loaf with a golden crust. Follow these simple instructions to get the batter snug in the dish:
Scrape the Bowl Clean: Using a rubber spatula, scrape every last bit of the luscious banana bread batter from the mixing bowl. Waste not, want not – ensure no delicious morsel goes to waste!
Smooth the Surface: Once all the batter is in the baking dish, use the rubber spatula to smooth out the top. Creating a level surface ensures even baking and a uniform appearance for your banana bread.
Tap and Settle: Gently tap the filled baking dish on the countertop to allow the batter to settle. This helps eliminate any air pockets trapped within the mixture and ensures a dense, moist, and tender texture.
Optional: Add Toppings or Mix-ins: If you’re feeling adventurous, add toppings or mix-ins to your banana bread. Chopped nuts, chocolate chips, or dried fruits can add delightful bursts of flavor and texture. Sprinkle them on the batter and gently press them down for even distribution.
Preheat the Oven: Before placing the baking dish in the oven, ensure it’s preheated to the recommended temperature. The hot oven will give your banana bread the heat it needs to rise beautifully.
With the batter evenly distributed in the baking dish, you can pop it into the preheated oven.
Baking the Banana Bread
The moment you’ve been waiting for has arrived – it’s time to bake your tantalizing banana bread to perfection. As the sweet aroma envelops your kitchen, you’ll know the delectable treat is coming. Follow these essential steps to ensure your banana bread turns out moist, golden brown, and utterly delicious:
Preheat the Oven: Before placing the baking dish in the oven, preheat it to the recommended temperature. This step ensures that the range is at the right heat level when the banana bread goes in, leading to even baking and a lovely crust.
Position the Baking Dish: Place the prepared baking dish with the banana bread batter on the center rack of the preheated oven. Positioning it in the middle of the range ensures even heat distribution, resulting in a uniform bake.
Set the Timer: Now that the baking dish is safely nestled in the oven, set the timer for the recommended baking time. Keep in mind that baking times may vary depending on the type of baking dish used and your oven’s quirks.
Perform the Toothpick Test: As the baking time nears its end, perform the toothpick test to determine if your banana bread is fully baked. Insert a toothpick or cake tester into the center of the bread; if it comes out clean or with just a few moist crumbs clinging to it, the banana bread is ready. If not, continue baking for a few more minutes and retest.
Cool and Savor: Once your banana bread is baked to perfection, remove it from the oven and place it on a wire rack to cool. Allow it to cool in the baking dish for about 10 minutes before carefully lifting it using the parchment paper overhang or sliding a knife around the edges. Transfer the bread to the wire rack to cool completely before slicing.
Optional: Store and Reheat: If you have any leftovers, store the cooled banana bread in an airtight container to maintain its freshness. When ready to enjoy a slice later, reheat it in the microwave or toaster oven for a warm and comforting treat.
With the final step completed, your journey to baking delicious banana bread without a loaf pan is complete. The satisfaction of crafting this mouthwatering delight from scratch is unmatched, and the joy of savoring each slice is a reward.
Alternative Baking Methods
Looking for creative ways to bake your banana bread? Try these alternative methods for a unique twist on this classic treat:
Banana Bread Muffins: Transform your banana bread batter into delightful muffins using a muffin tin. Grease the muffin cups or use paper liners, then fill them with the batter. Bake until golden brown, and enjoy servings of delicious banana bread.
Thinner Banana Bread in a Cake Pan: If you prefer lighter banana bread, consider using a round cake instead of a loaf pan. Spread the batter evenly in the cake pan, and when baked, you’ll have a delightful circular version of this beloved treat.
Get creative with these alternative baking methods, and explore new ways to enjoy homemade banana bread!
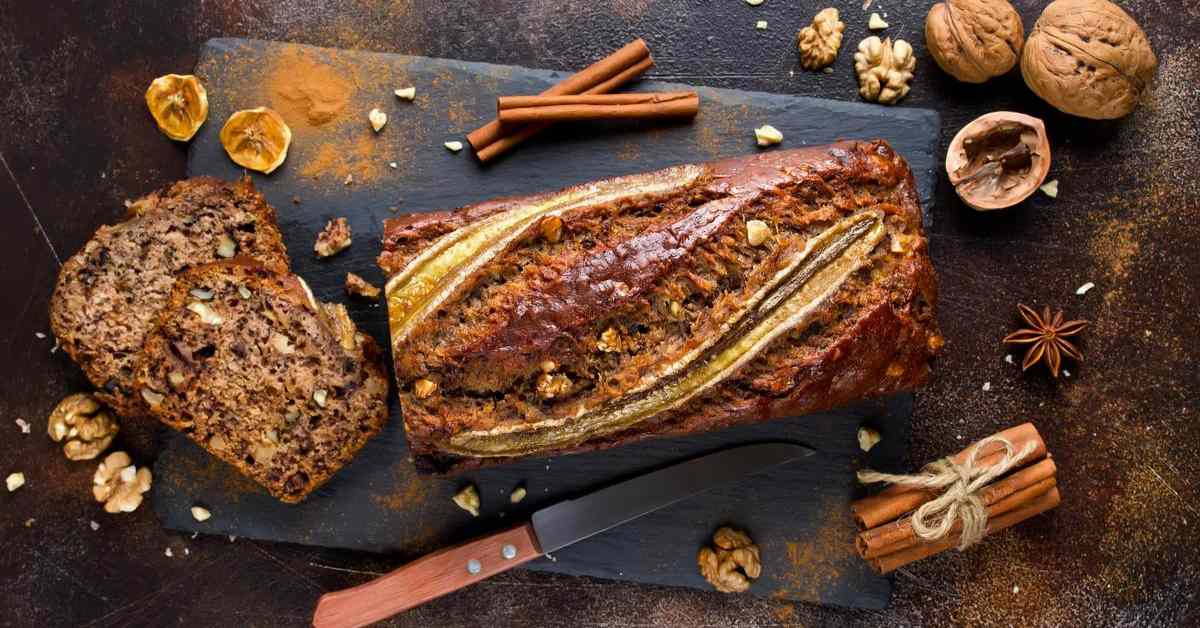
Variations of Banana Bread
Take your banana bread to the next level with these delightful variations that add a burst of flavor and excitement to the classic recipe:
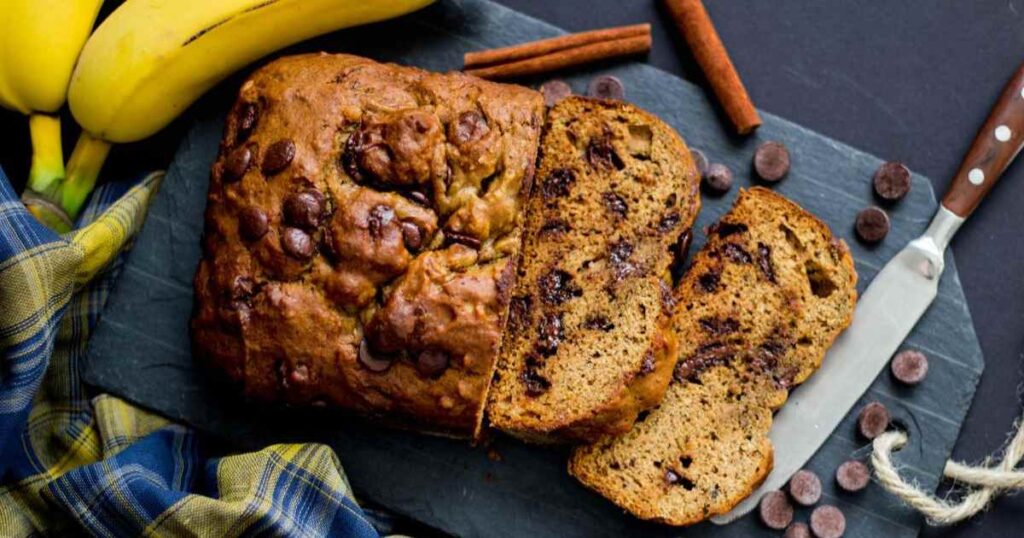
Chocolate Chip Banana Bread
Indulge your sweet tooth with the irresistible combination of ripe bananas and luscious chocolate chips. Fold a generous amount of chocolate chips into the banana bread batter before baking, and watch as they melt and create pockets of gooey goodness throughout the loaf.
Nutella Banana Bread
Elevate the richness of traditional banana bread by adding creamy Nutella to the mix. Swirl Nutella into the batter before baking to infuse each slice with the delectable taste of hazelnut and chocolate. It’s a match made in dessert heaven!
Gluten-Free Banana Bread
For those with gluten sensitivities or dietary preferences, enjoy the goodness of banana bread without gluten. Use gluten-free flour instead of all-purpose flour and follow the same steps to create a moist and flavorful loaf that’s friendly to your gluten-free lifestyle.
Experiment with these tantalizing variations, and let your taste buds savor the magic of these creative twists on the beloved banana bread recipe. Whichever variation you choose, you’re in for a delightful treat that will become a new favorite!
Common Mistakes to Avoid
Remember these common mistakes when baking banana bread without a loaf pan to ensure a successful and delightful outcome.
Overmixing the Batter: Avoid overmixing the batter once you’ve added the dry ingredients. Overmixing can lead to rigid and dense banana bread instead of the desired moist and fluffy texture.
Using Unripe Bananas: Use ripe bananas with brown spots on the skin for the best flavor and sweetness. Unripe bananas may result in a lackluster taste and texture.
Skipping Greasing and Lining: Properly grease and line your baking dish to prevent sticking and ensuring easy removal of the banana bread.
Incorrect Baking Time: Be mindful of the baking time, as over or underbaking can affect the final result. Use the toothpick test to check for doneness.
Not Preheating the Oven: Preheat your oven before placing the baking dish inside. This helps achieve even baking and a well-risen loaf.
By avoiding these common mistakes, you’ll be well on your way to baking a delectable banana bread that’s sure to impress!
Frequently Asked Questions (FAQs)
What can you use instead of a loaf pan for banana bread?
If you don’t have a loaf pan, several alternative options exist. You can use a rectangular or square baking dish, a round cake pan, a casserole dish, or even a muffin tin to make banana bread. Just ensure the pan is well-greased or lined to prevent sticking.
What else can I use if I don’t have a loaf pan?
In addition to the above mentioned options, you can use a bundt pan, a pie dish, or an oven-safe skillet. The key is to choose a pan with a similar capacity to a standard loaf pan and remember to grease or line it before pouring in the batter.
What is the best pan to bake banana bread in?
The best pan to bake banana bread in depends on personal preference and the desired outcome. A traditional loaf pan is ideal for a classic shape, but you can experiment with different pans, like rectangular, square, or round ones, to add variety to your banana bread.
How do you get banana bread out of the pan without breaking it?
To ensure your banana bread comes out of the pan without breaking, follow these steps: First, let the bread cool in the pan for about 10 minutes. Then, gently run a knife around the edges to loosen it. Use the parchment paper overhang (if you used it) or a spatula to carefully lift the bread out of the pan. If you grease and flour the pan, tapping it gently can also help release the bread.
Can you make homemade bread without a loaf pan?
Absolutely! While a loaf pan is commonly used for baking bread, you can make homemade bread without it. You can shape the bread into a free-form round or oval loaf and place it directly on a baking sheet or a pizza stone. This method is excellent for rustic and artisan-style bread. Just remember to slash the top of the bread to allow for even rising and a beautiful crust.
Conclusion
Baking delicious banana bread without a loaf pan opens up a world of creativity and possibilities in the kitchen. By choosing the suitable baking dish, properly preparing it, and mixing the perfect batter, you can achieve a moist and flavorful banana bread that will delight your taste buds.
Explore alternative baking methods and variations to add unique twists to this classic treat. Avoid common mistakes; with some experimentation, you can enjoy homemade banana bread in various shapes and sizes. Embrace the joy of baking, and savor the delightful results of your efforts. Happy baking!